You can find the gallery here.
Log in with your @stuy.edu account. You can upload an image or animated gif showing off your project in action.
Here are some gif recording programs that you can use to record your project in action. NOTE: some gifs can get VERY big. Try not to record longer than about 10 seconds, and try to set the framerate (fps) in your gif recorder to not more than about 20
- If you are on linux, you can use peek
- On windows, try using screentogif
- On mac, use the built-in screen recorder to get a .mov. Then use this site to convert that to a .gif.
Proof of Concept due Mon. 06/06 at 8:00am
MVP due Wed. 06/08 at 8:00am
Final Version due Mon. 06/13 at 8:00am
You will be working on the final projects in class through wednesday June 08th, which will be my last day.
Your Proof of Concept will be due on monday. You will need to submit it to the hwserver and demo it to me in class on monday. If you don't have something to show me in class on Monday, this will count against your final project grade, so make sure you save a copy of your working proof of concept and then don't modify it (i.e. do further work on a separate copy of your sketch).
You should have your Minimum Viable Project working by next Wednesday the 8th, and have it ready to demo to me in class. Again, submit your MVP by wednesday if you have it, and save a copy before you keep working.
An adequate design doc, Proof of Concept, and MVP, submitted on time, will get you a 90 on this project. The rest of the grade will be determined by your final submission. Your final submission MUST be submitted by 8:00am on Monday, June 13th. This is the drop-dead-deadline, I will not be looking at anything submitted past that point.
For you proof of concept and MVP, you will lose 2 points on the final project grade for every day they are late. If you do not demo them for me in class, make sure you email me to let me know they are submitted so I can grade them and give feedback.
For the final submission (and the MVP if you don't demo it for me in class), make sure you include
- Names of all group members
- instructions on running your project
- any libraries it depends on
- Key features added since the last submission (i.e. new features since MVP, since PoC)
due Fri. 06/03 at 8:00am
    Download the following template zip
    NOTE:
    - new methods have been added to the ExpressionTreeClasses, skim over them

    Add the following:

    ExpressionTreeNode (these functions are short and straightforward:)
        - ExpressionTreeNode(int x, int y, String token)
        - int nodeTypeFromString(String token)

    ExpressionTree (this function is the complex one:)
        - ExpressionTreeNode makeTreePrefix(int x, int y, StringList tokens, int numLevels)


    HINTS:
        For laying out the nodes, makeParseTreePrefix takes a depth
        You can use depth like so:  float xoffset = width / (pow(2, depth+1));

        for the expressionTreeNode(..., String token) constructor:
        The call to this(...) will call the other constructor to initialize most of
        instance variables. The "token" constructor just needs to set
        the type and value according to what token string is passed in.
        Do JUST the following:
            - set type = nodeTypeFromString(token)
            - if type is VAL, set value to the numeric value of the token string

        for makeParseTreePrefix():
            - the very first thing you should do is:
                - String currToken = tokens.remove(0);
                - make a node from the first token
            - then, think about how to recurse
            - it may be helpful to println(x, y, depth, tokens) as the first
              statement in makeParseTreePrefix, to see what it's doing on the recursions


    Challenge:

    To allow for infix expressions, make the following changes:

    Modify makeParseTreePrefix() to handle "(" and ")" in the token list.
        for prefix expressions, you can just ignore them. Test it on prefix2 in the driver

    Add a parameter to the ExpressionTree constructor to determine the type of expression.
        Example header: ExpressionTree(int x, int y, String expression, int expType).
    Write ExpressionTreeNode makeTreeInfix(int x, int y, StringList tokens, int numLevels)
        Generate an expression tree from an infix expression, using the algorithm described in class.

    Modify the driver file so that when it is run, 2 trees are created, one from the provided prefix expression and the second from the infix expression
due Thu. 06/02 at 8:00am
NOTICE: expressiontree differs from the variegated trees in the following ways:
- The left and right subtree chances are linked: i.e. either both children are present or both are null
- ExpressionTreeNodes no longer have a char data;, they now have a int type and a float value. makeTree initializes both of these to 0.
- Fill in the function populateTree() to initialize the tree nodes to represent a random arithmetic expression.
- Modify inOrder() to produce an infix expression string representing the tree, e.g. "(1.0 + (2.0 / 3.0))"
- Fill in the function evaluate() to evalue the arithmetic value of the expression.
Design Doc due Fri. 05/27
(printed version due Tue. 05/31)
    Using processing to create a graphical program.
    Using the keyboard & mouse for input.
    Writing code using the major control structures in Java such as methods, conditional statements and loops.
    Writing classes. (All projects must include at least 1 class)
    Using subclasses and inheritence.
    Data structures:
        1 dimensional arrays.
        2 dimensional arrays.
        ArrayLists.
        Linked Lists.
        Trees
    Image processing.
    Genetic algorithms.
    Using processing libraries.
For today, you should brainstorm 3 project ideas (even if you already have one you like, come up with a few others as well).
Submit ideas here
See everyone's responses here
A good project should include many of these conepts organically (that is, not in a strange or forced way), but some may use more than others. The only specific requirement is that you must have at least 1 class.
You should also focus on creating a program that works well. It is better to have fewer features in a project that compiles & runs smoothly than to have a lot of features that contain a lot of bugs.
When designing your project, it is best to be able to generate a base working project early and then add features modularly as time goes on.
Phase 0: Proposal
Create an initial proposal for your project, a couple paragraphs. Be sure to include:- Names of all people working on the project.
- Pick one person to be the group's representative
- High level description of the project. (Include a link if applicable)
- Any processing libraries you might be using.
- An initial description of how topics from this course will be used to help create the project.
When done, you (if working solo), or the representative (if in a group) should fill out the Signup form.
Phase 1: Design Document
Once your proposal has been accepted, spend time coming up with the design of your project. Make a document (e.g. a word doc). If working in a group, this should be a shared document everyone has access to. Put your proposal at the the top, then add the following sections:- List of classes you will be using. Include a description of the purpose of each class/file.
- For classes, be sure to describe to main features for that class. As well as the key methods.
- List of concepts from this course that will be used and how you will be using them.
- If applicable, any libraries you will be using and why.
- Description of how the user will interact with your program.
- Specific keyboard commands? Mouse interaction?
- Mock-up drawing of your program in action.
- If you will have different screens, a drawing for each one.
- Annotate your drawing by pointing out important features, interactions, etc.
- Come up with 3 distinct phases of development for your project:
- Phases are "proof of concept", "minimum viable project", "final goal"
- Proof of Concept: Smallest set of features to get something interactive. e.g. for tetris, just get a grid, different block falling, keyboard to move left and right. No rotation, no stacking, no line clearing, nothing extra.
- Minimum Viable Project: Smallest set of features you'd need to be able to say "it's ugly but it all works". e.g. for tetris, once you have block stacking, block rotating, and line clearing, you can say "this is a working game of tetris", even if not polished.
- Final Goal: All the features and polish you would like to have at the end: e.g. for something like tetris, maybe a score indicator, levels, next-piece indicator, visual effects, improved user interaction, fast drop, etc.
- Each phase should have a description, as well as multiple specific bulletpoints and sub-points of things it should have
- Each phase should have a mock-up drawing of what it should look like
Your design doc should be no less than 2 pages long. Please submit your design doc in digital form to the homework server by Friday (either a link or a pdf). ALSO bring in a printout of it next Tuesday (one per group), which I will be collecting.
due Mon. 05/23 at 8:00am
You can use your own or mine, which you can get in this zip
Make the following modifications to your Tree class:
    Change makeTree so that left and right subtrees are only sometimes made.
        Near the root, the chance should be high, so subtrees are almost always made.
        At deeper levels, the chance should be lower.
Add the following methods to your Tree class:
int numNodes(TreeNode current)
Return the number of total nodes of the tree rooted at current.
int getHeight(TreeNode current)
Return the height of the tree rooted at current
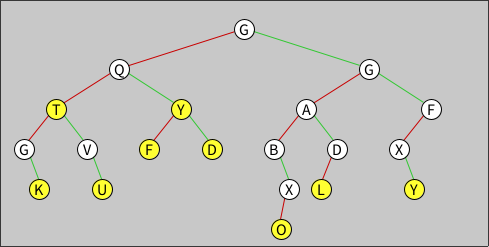
void colorCode(TreeNode current)
Check the heights of currents left and right subtrees.
If the heights are equal, change the color of the current node to yellow.
Recursively colorCode the rest of the nodes in the tree rooted at current.
Test this all in your main driver file.
A working version should look like the following:
due Fri 05/20 at 8:00am
    Modify TreeNode to contain a char data instance variable.
    Modify makeTree so that it provides each new node with a randomly chosen character.
    Add a String preOrder(TreeNode tn) method to your Tree class. It should return the string created by doign a pre-order traversal of the tree rooted at tn.
    Then create postOrder and inOrder methods.


    Also: if you want to lay out your nodes evenly, use this code:

        float xoff = width / (pow(2, (this.totalLevels - numLevels) +2));
        float leftx = x - xoff;
        float rightx = x + xoff;
==== end of addition === For this, you will be using the same TreeNode class from last time.
Create a Tree class with the following elements:
    Instance Variables:
        TreeNode root
        int totalLevels: The height of the tree

    Methods:
        Constructor: Tree(int x, int y, int numLevels)
            Set totalLevels to numLevels
            Use makeTree (describe below) to create a tree with numLevels,
            assign the return value from makeTree to root
        TreeNode makeTree(int x, int y, int numLevels)
            If numLevels is 0 or less, return null
            Create a new node at (x, y)
            Create a left subtree with numLevels-1 levels
            Create a right subtree with numLevels-1 levels
            return the root of the tree you just created
        void display(TreeNode current)
            Draw the tree rooted at current
Use the following as your driver file:
    Tree fir;

    void setup() {
        size(800, 500);

        fir = new Tree(250, 20, 4);
        fir.display(fir.root);
    }//setup
If you’ve gotten those things working, try the following:
In makeTree, create each node such that each level is evenly spaced across the screen. The space between sibling nodes should decrease with each level and always fit in the screen. The y values should increase by the same amount for each level.
due Monday 05/16 at 8:00am
For homework, please write a recursive draw function like we did in class today. You should use the TreeNode as is, ONLY modifying in the driver file.
- In your driver file, create at least 5 TreeNodes, and call display on them all in your draw() method.
- Link the .left and .right links of your treenodes together to make a tree with at least 3 levels.
- Write a function recursiveDisplay(TreeNode t), that displays the node t, then recurses on its .left child and its .right child. Change your draw() to only call recursiveDisplay() on the root node of the tree. Your recursive display should display all the nodes.
due Friday 05/13 at 8:00am
ADDITION ON WEDNESDAY 5/11:
    Add the following 2 methods to OrbList
        OrbNode findNextNode(float x)
            Return the left-most OrbNode to the right of the coordinate x.
            front should never be returned, so if x is to the left of front, return the node after front.
        void insertBefore(OrbNode n, int x, int y, boolean fixed)
            Create a new OrbNode or FixedOrb at (x, y).
            Insert the new orb into the list before orb n.
            Youn can assume that n is an orb in the list and that it is not front.
    Use findNextNode and insertBefore in your driver file to modify how orbs are added to the list.
Now, new orbs should still be placed at the position of the mouse, but instead of being at the front or back of the list, they should be linked inbetween the closest two nodes.
due Tue. 05/10 at 8:00am
If you need a complete OrbNode class, you can use my version.
Modify the OrbList class as follows (anything from the previous assignment not mentioned here should stay the same).
Methods
    void addFront(int x, int y, boolean fixed)
        - Create a new OrbNode or FixedOrbNode at position (x ,y).
            If fixed is true, make it a fixed node.
    void append(int x, int y, boolean fixed)
        - Create a new OrbNode or FixedOrbNode at position (x ,y).
            If fixed is true, make it a fixed node.
    void applyExternalForce(PVector f)
        - Apply f to every node in the list.
Main Driver File
Create a single OrbList object;
- Add at least 4 orbs to the list.
    - Make at least 1 of the orbs fixed.
- Use applySprings() on the list.
- Use applyExternalForce to apply a downward gravity-like force to the list.
- Call run() on the list.
- Use display() on the list.
due Thu. 05/05; at 8:00am
Also, you'll make your OrbList handle starting from empty, as well as keeping track of an extra "back" variable.
Modify the OrbList class as follows (anything from the previous assignment not mentioned here should stay the same).
Inastance Variables
    OrbNode front
    OrbNode back
Methods
    Constructor: OrbList()
        Creates an empty OrbList
    void addFront(int x, int y)
        Create a new OrbNode at position (x ,y).
        Add the new node to the front of the list.
        Make sure to correctly set the next and previous of any impacted nodes.
        Also remember this will modify front, and may also modify back.
    void append(int x, int y)
        Create a new OrbNode at position (x ,y).
        Add the new node to the end of the list.
        Make sure to correctly set the next and previous of any impacted nodes.
        Modify back as needed (and possibly front).
    void run()
        Loop through the list to call run on each OrbNode object;
    void applySprings()
        Loop through the list to call applySpringForce on each OrbNode object;
Main Driver File
    Create a single OrbList object;
    Add at least 3 orbs to the list.
    Call run() on the list.
    Use display() on the OrbList.
due Tue. 05/03 at 8:00am
One helpful thing about a list of OrbNodes is that each node keeps track of its position with its next and previous instance variables. Because of this, the OrbList class only needs to keep track of the first OrbNode in the list.
Create an OrbList class with the following (we will be adding things to this): Instance Variables
OrbNode front
Methods
        Constructor: OrbList(int x, int y)
            Create a new OrbNode at the provided coordinates.
            Set front equal to the new node.
        void display()
            Start at front, call display().
            Continue to call display() on all subsequent nodes until you reach the end of the list.
            This is a new design pattern for you. Things to consider:
                How do you know when you have reached the end of the list?
                How will you repeatedly move to the next node? (hint: for loops are most often used with numeric counters, is there another kind of look you know about?)
        void addFront(OrbNode o)
            Add o to the front of the list.
            Make sure to correctly set the next and previous of any impacted nodes.
            Also remember this will modify front
        void append(OrbNode o)
            Add o to the end of the list.
            Make sure to correctly set the next and previous of any impacted nodes.
            Also, you’ll have to get to the end of the list using a simlar process to what you did in display.
Main Driver File
        Create a single OrbList object;
        Create 3 OrbNodes, add them to the OrbList using a combination of addFront and append.
        Use display() on the OrbList.
If you get this all working, you can try working on having all the orbs in the list calculate their spring forces and then run.
due Fri 04/29 at 8:00am
Today's work: change your Orb to an OrbNode class. An orbnode will represent a single orb in a connected chain of orbs. Instead of the driver file applying spring forces manually to each Orb, your OrbNodes will automatically keep track of the OrbNodes that comes before and after them, and will use that to automatically apply their own springforces. Add the following to your OrbNode class
        Member variables
            OrbNode next
            OrbNode prev
        Constructor
            set next and prev to null
        display()
            if there is an OrbNode attached at next, draw a line between this and next
            if there is an OrbNode attached at prev, draw a line between this and prev
            The lines should be different colors, and should be slightly offset so you can see both
        applySpringForce()
            if there is an OrbNode attached at next, use calculateSpringForce to find the force between this and next, and apply that force to this
            if there is an OrbNode attached at prev, use calculateSpringForce to find the force between this and prev, and apply that force to this
Modify your driver file like so:
        Create 3 OrbNodes spaced horizontally, spaced appropriately apart so their springs are somewhat stretched.
        Connect each OrbNode to its neighbors using next and prev appropriately
        in runAStep(), have the right 2 nodes useApplySpringForce(), apply gravity to them, and run() them
        The leftmost node should stay fixed in place
Your code should look something like this
(Nothing to submit, just do it tonight)
- The current length of the spring is the distance between the center of this orb and the anchor orb. Make sure you use the euclidean distance formula, or use the built-in PVector.dist(...) to calculate this.
- Once you have the current length, calculating the displacement and thus the spring force should all be the same as yesterday's.
- When you go to return the PVector representing the force, you can't just make a new PVector(0, forceMagnitude). A spring can only apply force along its length, and so your PVector must be going in the same direction as the spring, i.e. from the center of this orb to the center of the other orb. Once you construct a PVector going in the right direction, you can set its magnitude to be your calculated force value by using the setMag() method.

If you haven't gotten it working after about a half-hour of trying, leave it where you've got it.
Due Wed 04/27 at 8:00am
First, finish writing a working Orb class, as we developed in class yesterday, and described below.
        Instance Variables

            PVector pos //position
            PVector vel //velocity
            PVector nextAccel //acceleration for the next tick
            float psize

        Methods
            Constructor: Orb(int x, int y)
                Set position to a PVector <x, y>.
                Set velocity and acceleration to <0, 0>
            void display()
                Draw a circle at position with diameter psize.
                You may use whatever color you’d like, or add a color instance variable.
            void applyForce(PVector f)
                Add f to nextAccel.
            boolean checkHitXBound(), boolean checkHitYBound()
                2 separate methods, return true if position is past the borders of the screen, taking psize into account.
            void run()
                Add nextAccel to velocity.
                Check the bounds, if the position has gone beyond the screen, multiply the appropriate component of vel by -1.
                Add velocity to position.
                Set nextAccel back to <0, 0>
Use the following driver file to test your class: w06_orb_driver.pde
Second: Add the spring force we discussed today.
        In your orb class
            Add the following constants for springs:
                static final float SPRING_LEN = 50; // "resting" length
                static final float SPRING_CONST = 0.005;
                static final float AIR_DAMPING = 0.995;
            Modify your run method:
                just before adding velocity to position, slow down velocity by a factor of AIR_DAMPING
            add a method: PVector calculateSpringForceY(Orb other)
                should return the spring force for a spring connecting this and other
                only consider the y-coordinates (i.e. assume the two orbs are directly above each other)

        In your driver file:
            Modify your reset() to create 2 orbs, one above the other
            The top orb should be an "anchor" orb that doesn't move, so don't apply any forces or call run on it
            in your runAStep(), use calculateSpringForceY to apply a spring force to the bottom orb.
You should see the bottom orb yo-yoing up and down below the top orb, like so:
Full project due Tue. 04/26 at 8:00am
Your mission is to use a genetic algorithm to help rockets land on the moon! By rockets, I mean triangle shaped objects and moon I mean a yellow square. To start, use this zip file to set up the assignment. You will have a Rocket class and a driver file that demonstrate how rockets work. Your program should contain the following files:
- Rocket
- Gene
- Individual
- Population
- (main driver file)
Fitness should be based on how far away a rocket is from the target. To incoperate the target you have a couple of options:
- Use a PVector object declared in the main driver file, which you can then pass into methods as needed. You will want to draw a rectangle at the location of the target in draw as well. This is a clean and straighforward approach.
- Create a new class to represent the target. The main advantage for this option is it provides a basis to have obstacle objects as well. It is not advised to do this unless you plan to add obstacles or other complications to the assignment.
The Gene, Individual and Population files should at least start as copies of the ones from the regulargon genetic algorithm lab. The genes for this assignment should encode the moves for the rocket to make. The genes should be used to encode both the angles and mangnitudes of each movement. No matter how you encode the mangnitudes, the maximum magnitude should be 0.1.
Planning Stage
Before any coding is done, you must fill in the provided README.md file with your answers to these design questions:- What parts of Gene, Individual and Population can be used exactly as they already are written? Why?
- What parts of Gene, Individual and Population will need to be modified? How will you modify them?
- How are you going to use Gene objects to encode the angles and magnitudes of each move?
- How is the main driver file going to differ from the regulargon version?
Project
A working project should have the following features:- Upon starting, a random population of rockets should be created & displayed, along with a target.
- The rockets should move according to their “programmed” angles and magnitudes until the maximum number of moves have been made.
- Once the moves have been made, all rockets should calculate their fitness, and display them.
- The console should display the generation #, along with the best and average fitness values.
- Nothing should change until m is pressed, at which point a new generation will be created and those rockets will run until completion.
- New generations should maintain the best rocket from the previous one.
- Pressing p should result in a new random population.
(NOTE: Document any extensions at the top of your README.md file.)
- Randomize the target and/or starting locations when creating new random populations.
- Highlight the best rocket in some way.
- Allow for different selection mechanisms via a keyboard command.
- Control the mutation rate via keyboard command.
- Add a toggleable "continuous mode" to automatically run the simulation
- Include obstacles in your program. If a rocket hits an obstacle it should stop moving
Phase 4 due Thu 04/07 at midnight Phase 3 due Wed 04/06 at midnight
Please submit this lab to the same Lab2 homework slot, we will keep adding to it for the next few assignments.
Phase 01:
In this lab you will be making your Individuals support mating. You will also be creating a fitness function to breed your Individuals for similarity. I have supplied the lab template for you to work from in this zip.
You will need to implement the following methods on Individual:
    Individual mate(Individual partner)
        // Should create a new individual and inherit genes from the parents.
        // Genes should be "crossed over", i.e. pick a random number
        // of genes to copy from one parent, and have the rest
        // copied from the other parent. Also, make sure that
        // which parent goes first is determined randomly each time.
        // Don't forget to use the Gene copy constructor

    void updateFitness(Individual target)
        // Should update the fitness variable
        // fitness should be calculated based on how similar
        // this individual is to the specified target
        // Make sure that the more similar it is, the higher the fitness
You will also need to add code to the driver file:
    void makeIndividuals()
        // Should initialize two Individuals and mate them
        // together to create a third.
        // Should call setFitness on them.
        // Print out all 3 individuals.

    void draw()
        // Don't need to add anything, but you will need
        // to uncomment the calls to display
due Thu. 03/31 at midnight
Create an Individual class to use in a genetic algorithm. An Indivudal should have a genotype represented as an array of Gene objects, and a phenotype represented as a RegularGon object.
An Individual should have genes to represent each of the following:
    Number of sides: Range should be [0, 31]
    Radius           Range should be [0, 63]
    Spin rate:       Range should be [-7,8]
    Red color:       Range should be [0, 255]
    Blue color:      Range should be [0, 255]
    Green color:     Range should be [0, 255]
Each of those ranges can be represented as a binary number of a specific length (you have to subtract 7 to get the spin rate values).
Also, create instance variables that will be used to set the correct length of each gene. e.g. int SIDES_GENE_LENGTH = 5;
Instance Variables (in addition to the gene length variables described above):
    Gene[] chromosome
    RegularGon phenotype
    float fitness // We wont use this just yet, but it will be necessary to implement a genetic algorithm.
Constructor:
    Individual(boolean randInd)
        Initialize chromosome to the correct size.
        If randInd is true:
            Populate chromosome with randomly generated Gene objects of the correct size (the Gene constructor will do all the work here).
            Once all the Gene objects have be created, call setPhenotype()
Methods:
    void setPhenotype()
        Extract the values of each of the genes in chromosome.
        Create a RegularGon object using those values.
        Set phenotype equal to that object.
    void mutate(float rate)
        Loop through chromosome.
        Each Gene in chromosome should have a rate chance to call mutate on itself.
        call setPhenotype()
    String toString()
        Return a String where each line is the toString of a Gene from chromosome
    void display(int x, int y, boolean showFitness)
        Call display using x and y as parameters on phenotype.
        If showFitness is true write fitness using text at x y
Use the following as your main driver file to test your work:
Individual i0, i1;

void setup() {
  size(400, 200);
  i0 = new Individual(true);
  i1 = new Individual(true);

  println(i0);
  println(i1);
}//setup

void draw() {
  background(255);

  i0.display(100, 100, false);
  i1.display(300, 100, true);
}//draw

void keyPressed() {
  if (key == 'p') {
    i0 = new Individual(true);
    i1 = new Individual(true);
  }
  if (key == 'm') {
    i0.mutate(0.1);
    i1.mutate(0.3);
  }
}//keyPressed
due Wed. 03/30 at 8:00am
The main part of the Gene class is the genotype, which is an array representation of a binary number. The length of the array will determine the number of digits and as a result, the maximum possible value of the Gene.
So a Gene of legth 5 has a maximum value of 11111 base 2, or 31.
- Instance Variables:
int genotype[]
    Gene(int gl)
        Generate a new Gene of the given length.
        Initialize the array accordingly.
        Randomly populate the gene with 1s or 0s.
    Gene(Gene copyFrom)
        Create a new Gene that is a copy of copyFrom.
        Remember that arrays work like objects, so genotype = copyFrom.genotype will not create a new copy of the array and will not copy the values over.
    int getValue()
        Loop through genotype as if it were a binary number, generating a single decimal (base 10) value to return.
        You may find it easier to think of genotype in reverse, that is ok. For further clarification, both of theses are valid ways of converting, you just need to pick one:
            {1,0,1,1,0}
                could be 16 + _ + 4 + 2 + _ or 22
                could be  1 + _ + 4 + 8 or 13
    void mutate()
        Randomly select a single element in genotype and flip it, meaning turn a 0 into a 1 or a 1 into a 0.
    String toString()
        Return genotype as a binary string followed by value.
        You should specify whether the start of the string is the big or little end.
        Using the examples above, the following would be vaild return values:
            "BE->10110 22"
            "LE->10110 13"
Write a file with a setup method that greates a few Genes and tests each of the methods, including the copy constructor.
However, if you work with someone, or get help or advice from one of you classmates, or if you GIVE help to someone else, you must note that in the comments-to-teacher box when you submit your homework.
due Sun. 3/27 at midnight
- In TriangleGon, the parameters to the constructor are just the same as bX, bY, bW, bH, they're just named wrong
- randomize() methods should modify the object they're called on. Also, if you want to remove points, you can use the IntList's clear() method to do so.
This is a lab. You'll be working from this starter code l01_gongridlab_blank.zip.
In this lab you will be creating an array of PathShape objects to contain different subClasses of PathShape. You will also work on generating random PathShape objects and displaying them in a grid. You should make it possible to repopulate the array by pressing the "r", "t", and "p" keys for RegularGons, TriangleGons, and Pathshapes, respectively
Below are examples of what should be produced:
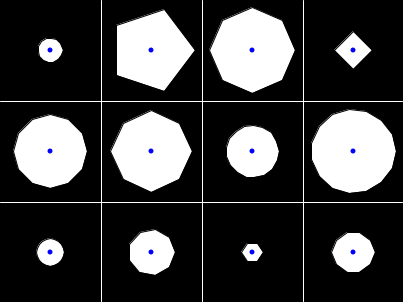
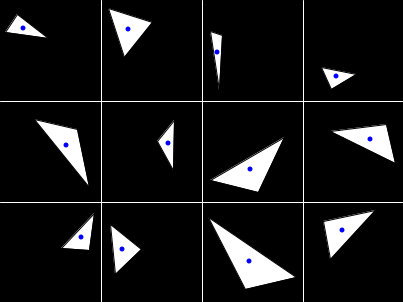
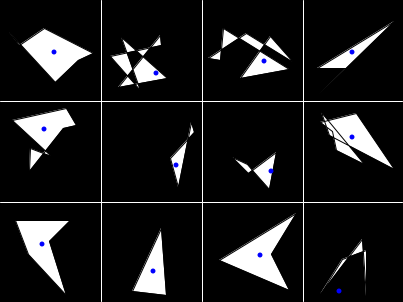
As a bonus: see if you can also add a "wild" mode, which will fill the grid with a randomly selected mix of PShapes, RGons, and TGons when you press "w"
due Wed. 03/23 at midnight
- In light of the SAT on wednesday, the due date for this is moved to Wednesday night.
- If it helps you with your homework, I have uploaded my solution for the "Grand Central" homework, which you can find here: w02_centroid_finished_clean.zip
- Also: please write how much time this assignment took, in decimal hours, into the comments-to-teacher box.
- RegularGon
- Should represent a regular polygon as defined by a center, number of sides, and radius.
- New Instance Variables:
int numSides, int radius
- New methods:
generateRegularPolygon() Adds points to xs and ys to create a regular polygon defined by the instance variables numSides and radius. You can generate the appropriate points for a regular polygon by performing the following calculations: x = radius * cos(theta * i) + cx y = radius * sin(theta * i) + cy Where theta = radians(360 / numSides) and (cx, cy) is the center of the bounding box bx,by,bw,bh RegularGon(int bx, int by, int bw, int bh, int sides, int length) Sets centroid to be the center of the rectangle defined by bx,by,bw,bh Sets numSides and radius to sides and length. Calls generateRegularPolygon() - TriangleGon
- No new instance variables
- No new methods.
- Overridden methods:
setCentroid()
    The centroid of a triangle can be found by averaging the x and y
    coordinates of each vertex. This is a much simpler calculation
    than the general form used in PathShape, and also doesn't involve
    area at all.

addPoint()
    If there are already three points in the vertex lists, then
    addPoint should do nothing.
due Mon. 3/21, at 8:00am
    //Add 4 instance variables to record the bounding box of the PathShape
    int bX, bY, bW, bH;

    //Modify your PathShape's constructor to take 4 parameters to set the bounding box of the PathShape
    PathShape(int bX, int bY, int bW, int bH);
The centroid of a polygon is a formulaic way of identifying what we would consider the "center", which is non-trivial for irregular polygons.
To find the centroid you must iterate over all the vertices of the polygon.
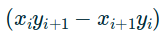
- For each point from 0 to the number of points - 1, take the sum of the following, stored separately (like in sumX and sumY variables):
- When i gets to the last point, perform the calculations above replacing i + 1 with 0. That is to say: the correct calculation requires the last point to loop back around to the first.
- Take both of those sums and divide each by ( 6 times the signed area of the polygon ).
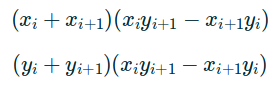
To find the signed area, we will again need to iterate over the vertices of the polygon:
- For each point from 0 to the number of points - 1, take the sum of the following. (This is a single calculation, as opposed to the previous calculations)
- When i gets to the last point, perform the calculations above replacing i + 1 with 0. That is to say: the correct calculation requires the last point to loop back around to the first.
- At the end, take the cumulative sum and divide it by 2.
    2 new instance variables:
        int[] centroid: an array to store the x and y values of the centroid. (shoud be a `new int[2];`, centroid[0] holds x, centroid[1] holds y)
        float area: stores the signed area, as defined above.
    3 modified methods:
        Constructor
            Initiliazes the centroid array, and sets both it and area to 0s.
        display
            Draws a circle of diameter 5 at the centroid. Use a different color than the inside instance variable.
        addPoint
            Should modify the area and centroid using the 2 new functions defined below.
    2 new methods:
        void setArea()
            Sets the area instance variable as defined above.
        void setCentroid()
            Sets the centroid instance variable.
due Thu. 3/17, at 8:00am
A PathShape will have the following instance variables:
    IntList xs: An IntList of x values for each vertex in the shape.
    IntList ys: An IntList of y values for each vertex in the shape.
    color border: The stroke color for the shape.
    color inside: The fill color for the shape.
And the following methods:
    Constructor:
        //initialize the lists and set the colors to what you deem reasonable.
    addPoint(int x, int y)
        // Add x and y to the appropriate lists.
    display()
        // Use beginShape, vertex, and endshape to draw the PathShape on the processing screen.
        // The shape should use the instance's color variables accordingly.
        // The shape should be closed, so that the last point connects to the first.
In your Driver file, declare a global PathShape variable
- To start, initialize a new PathShape in setup, add a few points and call display to check that your class is working.
- Then add a draw that calls background and display on your PathShape.
- Finally, add a mousePressed method. When mousePressed is triggered, the current location of the mouse should be added to the PathShape.
SUBMISSION NOTES: In "Comments to Teacher", please put down the amount of time you spent working on this at home, in decimal hours (i.e. 0.5 == 30 minutes);
INITIAL DESIGN:
due Thu. 3/10 at midnight
PROJECT:
due Fri. 3/18 at midnight
This is a project, as such, it will be graded for correctness. You may work in pairs if you like.
Your goal is to write a functional wordle game. Below are features of a working program that you need to implement:
- Use the same rules as wordle:
- 6 attempts to guess a 5 letter word.
- Each guess should be colored to indicate which letters are not in the target word at all, which letters are in the word but in a different position, and which letters match with the target word exactly (same letter + same position).
- Target word should be randomly selected from a file of potential words.
- The user interface should be similar to wordle's.
- Displaying the guesses and responses.
- Only accepting a guess when the user has pressed enter.
- Only accepting real words as guesses.
- Allowing the user to delete characters from the current guess.
- Stopping the game when either all guesses have been used or the target has been correctly guessed.
- Adding a keyboard below the guess grid that colors each letter based on game responses.
- Letting the user start a new game after the current one is over.
- Providing a visual indication that a word is invalid before/after pressing enter.
- Recording win stats that persist between games.
- Including a "hard mode", that requires new guesses to use all letters confirmed from past guesses.
Here are two word lists which you may find helpful: all_words.txt, sensible_words.txt
Design Stage:
Before any coding is done, you should spend some time thinking about how to organize your wordle. Submit to the HW server in the comments box the following:- Five (5) questions about the Game Interface
- Five (5) questions about the Game Engine
- The different files your wordle will have, and what parts of the game will be handled by each one
due Tue. 3/8 at midnight
    void drawBase(char base, int x, int y, int sz)
        // Draws a single base in a square at (x, y) with sidelength sz.
        // The squares should have no stroke, and each nucleotide should be given a different clolor.
        // The letter for the nucleotide should be displayed within the square in a color that is easy to see.
    void drawStrand(String dna, int x, int y, int sz)
        // Draws the entire dna strand starting at (x, y) using sz for the size of each square.
        // This method should call drawBase.

    void strandCompare(String strand0, String strand1, int x, int y, int sz)
        // Draws strand0 directly above strand1.
        // If there is a nucleotide mismatch, draw a red border around the nucleotide.

    void showProtein(String dna, int x, int y, int sz)
        // Draws dna, assume that it contains volid code for a protein.
        // Draws a rectangle under the entire start codon.
        // Draws a rectangle under the entire ending codon.

due Sun. 3/6 at midnight
- for strandMatch(), ignore any protein/codon stuff, just check if the nucleotides match up A to T, C to G.
- Codons don't necessarily start at character 0,3, etc in the string. Your code should handle DNA strings like "ATGAAA", "CATGAAA", "CCATGAAA".
TCGCAGCTCGAACCACTATGWhen two strands of DNA match, adenine is paired with thymine, and cytosine is paired with guanine. So the following two DNA strands match:
 TCGCAGCTCGAACCACTATG
 AGCGTCGAGCTTGGTGATAC
Generally, DNA is used to represent proteins, which are sequences of amino acids. Three (3) nucleotides together are called a codon, and each possible codon represents a specific amino acid, e.g. gaa represents glutamic acid. Therefore to represent a specific protein, a strand of DNA will consist of a sequence of codons for the protein's amino acids, such as 'gaatccccc'.
Additionally, the sequence ATG marks the start of a protein, and TAA, TGA, and TAG represent the end of a protein. Using the information above, write the following functions:
    boolean strandMatch(String strand0, String strand1)
        // Returns true if strand0 and strand1 match as described above.

    int findCodon(String strand, Sting codon)
        // Returns the index of the first time codon appears in strand
        // If codon is not in strand, returns -1.

    boolean containsProtein(String dna)
        // Returns true if dna contains an entire protein.
        // For our purposes, a DNA sequence contains a protein if it has a start codon, an end codon, and at least 5 codons between those 2. (this is not biologically accurate).

    String getProtein(String dna)
        // If dna contains a protein sequence (as defined above), returns the substring of dna that contains the first complete protein sequence, including the start and stop codons.
        // Otherwise, returns the empty String ("")
The following strings can be used to test the protein functions:
String protein0 = "ATGTCGCAGCTCGAACCACTGTGA";
String protein1 = "TCGATGCAGCTCGAACCACTGTAG";
String noProtein0 = "TCGATGCAGCTCGAACCACTG";
String noProtein1 = "TCGCAGCTCGAACCACTGTAG";
String noProtein2 = "TCGTAGCAGCTCGAACCACTGATG";
String noProtein3 = "ATGTCGCAGTAACTCGAACCACTG";
String noProtein4 = "TCGATGCAGCTCGAACACTGTAG";
Homework due Fri 3/4 8AM
(i.e. before class tomorrow)
Please include your name and class period in the subject line of your email.
EXTENSION:
Due Mon, Mar. 14, 8:00a
(Orig. Due Tues, Mar. 1, 8:00a)
Due to some issues in the original steganography instructions, we have gone back and revised the assignment, cleaning up some of the more confusing aspects and hopefully making it easier to follow. If you have not yet managed to submit the original assignment, please try using the version 2 of the instructions and the revised template (Stego_v2.zip). Submit your completed stego_v2 to the steganography assignment on the hw server, with a comment saying that you used the v2 instructions. (If you already completed the original, there's no need to re-do anything).
We're going to be working on a form of Steganography (coding of hidden messages).
Here's a template for the code that you should complete (Stego.zip). Right-click and download and unzip.
due Wed, 2/9 midnight.
- Spend today (Friday, 2/4) creating groups, and doing initial explorations of libraries.
- Groups need to be registered by Wed, 2/9
import processing.video.*;
Capture video;

void setup() {
  size(640,480);
  video = new Capture(this,Capture.list()[0]);
  video.start();
}

void draw() {
    video.resize(width,height);
    image(video,0,0);
}

void captureEvent(Capture video) {
  video.read();
} - Go to the main class link page (http://bert.stuy.edu/pbrooks)
- Click on the Homework/Grade server link (or use the one at the bottom of this webpage)
- Choose the Profile menu item
- Choose your period and name
- Log in with your OSIS number as your password
- Fill out your email address and preferred first name only, DO NOT CHANGE YOUR PASSWORD YET.
- Save: (press Change Profile button)...
- (optional, but recommended): now you should change your password for this Homework server:
- Go back to the Profile page, create a password and press the Change Password button.
- REMEMBER this password!
You MUST include your name in the subject line or body of the message, otherwise I won't know who it's from.